Showing posts with label food. Show all posts

White Chocolate and Orange Chocolate Chip Cookies


Can we just talk about these cookies for a minute?

They're literally everything.

White chocolate and orange chocolate chip...

Soft, moist, filled with goodness.

I will most definitely make these again!


2 eggs, large
3 cups all-purpose flour
2 tsp baking soda
3/4 cup light brown sugar, firmly packed
1 cup milk chocolate chips
1 cup white chocolate chips
3/4 cup granulated sugar
1 tsp salt
2 tsp vanilla extract
1 cup butter, unsalted (room temp)
Juice and zest of 1 orange


Preheat the oven to 350°F and line 2 baking sheets with parchment paper.

In a medium bowl, sift the dry ingredients: flour, baking soda and salt together.

In another large bowl, using an electric mixer at medium speed, beat together the butter, and sugars until smooth and mixed together well.

Add the egg and vanilla and mix on low speed until mixed in.
Gradually add the flour mixture and mix in until just incorporated. Do not over-mix.

Add the chocolate chips and stir with a wooden spoon, again just until incorporated.

Add the zest and juice of the orange and slightly mix again with the wooden spoon.

Using a heaping tablespoon, drop the dough onto the prepared baking sheets, about 9 per pan.

Bake one sheet at a time for about 10-13 minutes. You should pull them out while they are still soft. They will finish baking/firming while sitting on the counter.

Let them set for about 15-20 minutes... then enjoy!


Charcuterie 101


Sometimes a charcuterie board is the only dinner you need!

While the arrangement may be simple, these foods are glorious!

Lifestyle changes are easy to keep up with when they're fun, convenient, and sustainable.

It sure helps when they're pretty too!

Also- I've learned that dates and cheese... followed by a Turkish fig... are a favorite snack combo!

Umm... yum!

Pair that yumminess with some summer sausage, prosciutto, cornichons, olives, and even more cheese... you're all set!

What's one of your favorite things to munch on?


Benfield Jalapeno Cornbread


This was hands down the best cornbread we've ever made. Aaron and I tag teamed this one and crushed it!

To (quite literally) spice it up, we threw in some diced jalapeños, too.

This was just one of three pans used... the mixture made a decent amount.

I've never been huge on cornbread, honestly... but I could eat this quite often.

1 2/3 cup yellow cornmeal
1 2/3 cup all purpose, unbleached flour
1/2 cup granulated sugar
2 tbsp baking powder
1 1/2 tsp salt
1 2/3 cup almond milk
4 large eggs, lightly beaten
1/2 cup, plus 2 1/2 tbsp unsalted butter, melted

Preheat your oven to 375F. Place your generously greased cast iron skillets in immediately, so they can get piping hot. 

In a large bowl, mix your dry ingredients. Once combined, make a well and pour in your wet ingredients. Stir together the wet and dry ingredients just until combined. Your batter should still be slightly lumpy. You don't want to overmix. 

Remove your cast iron skillets and pour in your batter. Bake until the bread is golden brown around the edges. (If you're using a "special" cornbread cast iron skillet like the one in the picture (or the ones that look like corn cobs) you'll bake for about 7-10 minutes.) If you're using a normal cast iron skillet, you'll bake about 25-30 minutes. A cake tester inserted into the center should come out clean. Let the cornbread set for at least15 minutes before you try to remove it from the pan.

I'm telling ya; pairing it with the right soup would make some hearts warm and happy this winter!


White Chocolate Pudding with Orange and Ginger


Well, this was yummy!

I'm not too embarrassed to tell you this was supposed to be a mousse, but turned out more like a pudding... 

Working on that technique!

Nonetheless, these flavors were straight fire.

White chocolate "pudding" with orange and ginger.
.
Took 6 ingredients, 3 steps, and some "chill time" to make.
.
Super cute, easy, delicious, and festive 🎅🏻🎄 little dessert for you and yours!
.
Drop a comment if you want the full recipe.


Egg Bites


 Egg White Bites for the win.


Quick, easy, meal prep gold, macro-friendly... these babies are just plain yum!

In a bowl, mix together Costco cartoned egg whites, diced roasted red peppers, diced green peppers, a smidge of garlic powder, salt and pepper, and a bit of your favorite cheese.

Use a greased (or parchment lined) muffin tray and fill about 3/4 of each cup.

Bake at 350°F for about 20-30 minutes, but continue checking. They should be "jiggling" just slightly when you remove them from the oven, as they'll continue to cook a little more on the counter.

Eat right away or store in an airtight container in the fridge for up to 5-7 days.

Voila!


Don't Sleep on Eggplant


Too many of y'all be sleeping on eggplant!
.
I did for too long. It was too bitter for me. Convinced it was a disgusting veg. But about a year ago, I watched a YouTube video of @countrylifevlogs68 and learned to slice it up and soak in salt water for at least an hour first.
.
Game changer!
.
That removes all the nastiness. (Your water will be a 1902 Wild West tub water brown.)
.
Yum!
😂🤪
.
But after your pieces have soaked and are dried with a towel, you can begin your meal prep.
.
Eggplant parmigiana has become a fave in the Benfield house. Definitely a healthy, delicious staple in our menu.
.
What are your favorite eggplant (aka aubergine) meals? I'd love to try out some new ones!


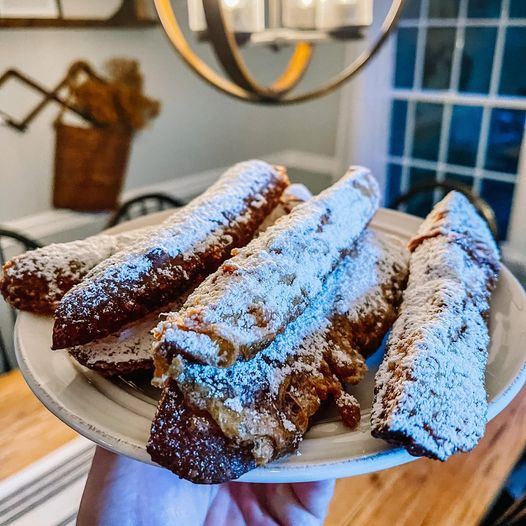
Pretzel (Bun) Sticks


These babies were a creative, resourceful, and delicious treat!

@mytattedtake did it again!

Our favorite breads are the pretzel buns our Kroger bakery makes... but because they're so fresh, they mold up much quicker than your "normal" loaf.

So, to get ahead of the game, he quartered some up, dipped them in some oat milk cinnamon swirl creamer, then egg, and then fried quickly in corn oil.

As soon as we had them all done, we sprinkled generously with powdered sugar and drizzled with warm honey.

I only ate one, but I could have eaten them all! The yummiest! Such a quick and easy, tasty treat.

And they were rustic and beautiful to look at, too!

I encourage you to give this a try!

Easy Italian Chicken and Rice


Let me tell y'all about one of my favorite meals... ever.

This incredibly easy, quick, and delicious Italian Chicken and Rice dish is perfect for busy families.

To start, put 2 tbsp of your favorite butter in a deep pan, over medium-low heat. As it's melting, add about 2 tbsp of your favorite Italian dressing, too. (Stay tuned and I'll share my recipe for homemade Italian dressing.)

Once the butter is melted and the dressing is warm, add 3 chicken breasts, cubed.


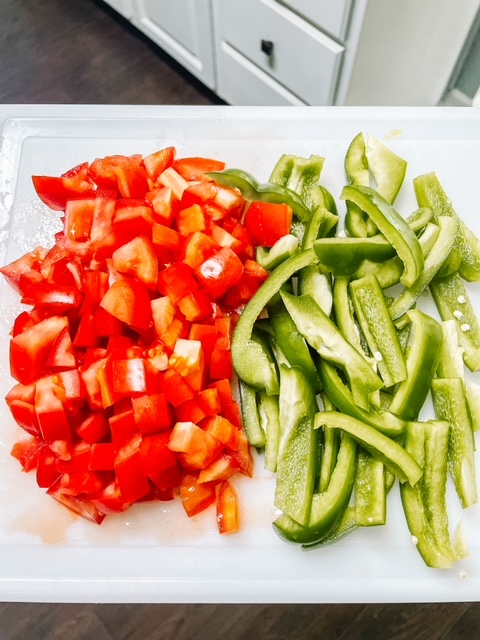
While your chicken is cooking, dice up 2 large bell peppers and 3-4 tomatoes.

(This is perfect if you're trying to find uses for your freshly grown veggies like me!)


Once your chicken is just cooked through, add 2 cups water and 2 1/2 cups of instant brown rice. It may require more water, so just pay attention and add about 2 tbsp at a time, if you feel the rice isn't submerged enough.

Once I get it all mixed up, I usually add another 2-4 tbsp of Italian dressing. 
(Be prepared, you're going to pretty much use the whole bottle.)

I usually add in about 3/4 cup of my favorite chicken stock now, too.


I usually let this cook uncovered for about 5-7 minutes before adding in my bell peppers. 


Once you've dropped them in, add in another 2-3 tbsp of Italian dressing and then cover!


I usually let this simmer for about 7 minutes before removing the lid. (Make sure there's enough liquid left in the pan, although your rice should be absorbing quite a bit now and softening up.) 

Your peppers' color should change to a deep olive green when they're cooked through. 


Once the lid is removed, add in your diced tomatoes and (you guessed it!) at least 2-3 more tbsp of Italian dressing. Stir the mixture up and let it simmer uncovered for another 5-10 minutes. 


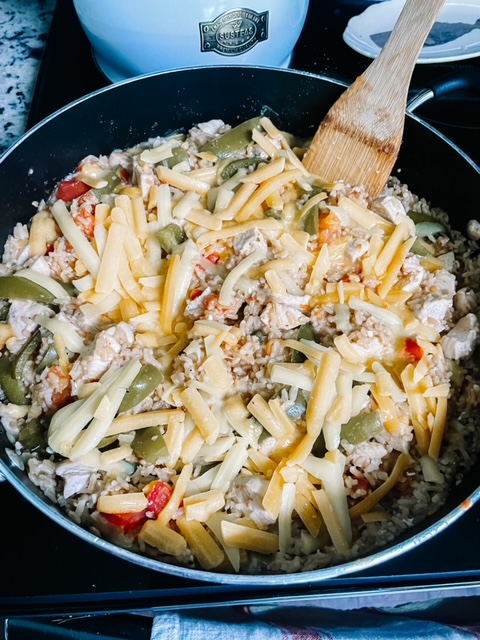
Once your rice is fluffy and fully cooked through, your dish is ready for the final addition of Italian dressing and some shredded cheese. 


Once your cheese melts, this lovely dish is ready to serve!

I love this meal for its taste, simplicity, and for the fact that I can easily calculate macros. It's a perfect combo of carbs, proteins, and fats... as long as you can control the portions. And that, my friends, is a little hard to do. 

This recipe serves 6 easily or allows for leftovers... which is an absolute favorite of mine. 


Would you just look at that creamy, colorful goodness?! 

Try it out and let me know what you think. 


Making Homemade Biscuits and Bacon Gravy


Today, I'm going to give out my best biscuit recipe, and share a video on how to get the perfect gravy to pair with it. I've had so many people tell me that gravy is such a struggle for them. 

"It's too clumpy." 
"It's way too thick."
"It's always too runny."

I've never had too much of an issue, because I've learned a couple little tips along the way. They've led me to perfect gravy every time. 


Before we get into the video, let's talk about these biscuits!

Prep time only 15 minutes.

2 3/4 cup unbleached flour
3 tbsp raw sugar
2 tbsp baking powder
1/2 tsp salt
1 tsp cream of tartar
1 cup almond milk
3/4 cup COLD butter
1 egg

Mix the dry ingredients. 
Add the butter into the mixture by cutting; use a pastry blender or butter knife to cut in. 
(You want pea size lumps throughout your batter.)
Add the milk and the egg and stir only until combined. 


Flour your surface and put on your sticky dough. 
Add some flour to the dough as you roll out into 1 inch thickness. 


I use a glass cup to cut out my biscuits. 
You can get 12, but I usually end up with 10.

I stack one “cut” on top of another, before putting in the oven. This gives me that rustic look I want. 
(Also helps when separating for jams, eggs and bacon, etc.)


Bake on 450 for 10-12 minutes. 
Don’t over bake!

This is key- check your biscuits after 8 minutes; and begin checking every 2 minutes. A biscuit can overbake so quickly. To get them fully cooked, and perfectly soft every time, follow this tip. 
They should just barely be golden... no brown! Pull them out and let them finish "baking" on the counter. This will keep them soft and flaky, without crisp edges and dry centers. 


Aren't they just lovely? 

Wait until you try one of them! They're absolutely delicious. 

Takes you back to a 1901 farm breakfast kinda' nostalgia. Seriously- grandmas everywhere would be proud of these beauties!
Ok, now let's move on to the country bacon gravy -- with oat milk. Dairy doesn't treat Aaron too well, so we substitute wherever we can. You don't have to, though. 
If you prefer cow milk, you can still rock this recipe out, along with all techniques followed. 

Just don't overthink it. It's very simple. Go by what feels right, one step at a time. You'll be a gravy expert in no time!


Kristi B's Perfect Pan-Cakes


We all know there are about a million and one amazing pancake recipes out there, but this one is mine! It's so good and almost completely dairy free. I'll keep searching for the best egg substitute to make it completely vegan, but until then... try these out!

They're fluffy and have that perfect denseness. They're just sweet enough to not be too much with the added syrup. 

This morning, I just wanted some good old-fashioned pancakes. I've been branching out and creating my own recipes lately, cause... #goals, so I grabbed a bowl or two and got after it. 


Aaron just had his wisdom teeth removed yesterday, so I figured they'd be good for him to eat, too. Thankfully, they were, and he loved them. 

He knows and loves good food, so when he compliments my recipes, it tickles me pink!

All you need is:

2 heaping spoonsful of butter
1 egg
3/4 tsp pure vanilla
1 1/2 cups oat milk
1 1/2 cups flour
1/2 tsp baking powder
3/4 tsp baking soda
1/4 cup sugar


Start off with two heaping spoonsful of salted vegan butter. (You can use regular salted butter if you're not trying to cut the dairy.) If you don't have salted butter, just add a 1/2 tsp of salt as instructed below.

Put in a bowl and warm it up for about 15 seconds. (You don't want it to fully melt.) 

Once removed, take your spoon and beat the butter until it's liquified. This will keep the butter cool, though, which is much better for setting the pancakes.

Next, add one egg and beat in with the butter. 

Pour in about 3/4 tsp of pure vanilla and 1/2 cup of oat milk.

In a separate bowl, combine your flour, baking powder, and baking soda. 
(If you only have unsalted butter, add in 1/2 tsp of salt to this mixture.)

Once combined, pour your dry ingredients in with your wet ingredients. Mix well. You will then add more oat milk, 1/2 cup at a time, as needed. (You shouldn't need more than another cup.)

Stir the batter well. 

Warm up a non-stick frying pan on the stove over med-high heat. Pour in about 1-2 tbsp vegetable oil and let it heat up. (You can test by adding a drop of water into the pan. If it sizzles, you're good to go!)

Using a 1/4 cup measuring scoop, pour the batter into the pan and let cook about 1-2 minutes each side. Don't flip until the cakes begin to bubble up in the middle. They should be just golden brown.

This recipe makes about 5 pancakes.

It only takes about 5 minutes to prep and 10 minutes to cook. Perfect for that quick back-to-school breakfast... it'll be approaching before you know it!

Top with butter, fruit, whipped cream, peanut butter, or syrup... or all the above if your little heart so desires!

We loved them and will definitely use this recipe again and again!


Try them out and let me know what you think!


Strawberry Blondies, with a Strawberry Lemon Glaze


These strawberry blondies, with a strawberry lemon glaze, are incredible, friends!

They take a little time and effort, but if you're willing to spend just a little time in the kitchen for a pretty, fun dessert, you should give these babies a go!

To start, preheat your oven to 350°F and then make your dough:


2 sticks (1 cup) unsalted butter, room temperature
3/4 cup granulated sugar
1 egg, room temperature
Juice of 1 lemon
Zest of 1 lemon
1/4 tsp almond extract
2 1/2 cups all purpose flour, unbleached
1/2 tsp baking powder
1/2 tsp salt


Cream the butter and sugar until thick and somewhat fluffy, using your stand mixer. If you don't have one, a hand mixer will work just fine.
Beat in the egg until incorporated. 
Add in your almond extract, lemon juice, and lemon zest. 

In a separate bowl, combine your flour, baking powder, and salt using a whisk.

Add to your wet ingredients. Mix until well combined. *The dough will be thick.*

To finish, watch this short video for the instructions:

*Note - I tried this recipe out using 1 1/2 cups of fresh strawberries. Even though I coated them with flour before incorporating, the liquid still made the desserts a little moister than I'd usually prefer. However, they can dry out, so I would do no less than 1 cup.


You gently fold in your diced strawberries and then transfer the batter to a parchment paper lined 9x9 inch baking dish. Smooth out as much as you can, without crushing the fruit. Again, the dough is thick, so it may take a couple minutes. 


Bake for about 30-35 minutes. They should start to appear golden around the outer edges and on the top. You also want to make sure the middle of the batter is set. (Insert a knife to see if it comes out clean.) 

After sitting out for about 10 minutes, remove the dessert by holding onto the parchment paper and transfer to a cooling rack so the bottom doesn't become soggy from the strawberries. (If this is proving to be difficult, you may need to put it back in the oven for another 3-5 minutes and repeat this process.)

The glaze should be ready for you to use. 
Puree of 2-3 large strawberries
Juice of 1 lemon
1 cup powdered sugar

Just don't pour over the blondies until fully cooled and sliced. 

They are sweet and a little tart, too! They may do well with some morning coffee and eaten like a strawberry crepe-flavored coffee cake. Yum!

Or, pair with some vanilla ice cream or cool whip to tame the tang.  Whatever your flavor preference is, these beauties are a must-try!